just anonym
New Member
- Joined
- Jun 25, 2023
- Messages
- 4
- Reaction score
- 2
- Points
- 3
- Age
- 22
Just wondering, what if the base.png is of the one color, will it work? for example so
Last edited:
Just wondering, what if the base.png is of the one color, will it work? for example soI figured out a method to turn normal sprites into palettized sprites (sprites readable by the Palette Editor) a while ago, around the time Annie was announced. So now that I've got the process down, I'm opening submissions.
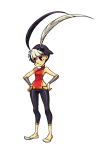
View attachment 18335
The Palette File Pipeline
Alternatively, instead of raw.png and base.png, you may submit a highlights layer (highlight.png) and a shadows layer (shadow.png) .
- Choose a raw image (raw.png).
- Using the raw image, create the linework layer (line.png).
- Soft edges are allowed. If tracing, use the brush tool. If using selections, turn on anti-aliasing.
- The script only reads the alpha channel here; it does not use any color information.
- Using the raw image, create the base colors layer (base.png).
- Hard edges are required. Use the pencil tool instead of the brush. For other tools, turn off anti-aliasing and feathering.
- Using the base colors layer, create the color areas layer (area.png).
- Hard edges are required.
- Different items/materials/areas should be different colors.
- If colors match in this color map, they will match forever. (E.g. if the hat and the skin are both colored #A1B2C3 in your area.png submission, then the hat will always be skin-colored in the Palette Editor no matter what.)
- If you're picky about color IDs, encode them in the red channel. See this reply for more info.
- Submit the layers (raw.png, line.png, base.png, and area.png) in a reply to this post.
- I will input it into create_sprite.py and upload the result to the Palette Editor.
Here are some sample PSD files of sprites I've converted: Google Drive Folder
Step 4 requires a bit of coordination since all sprites of a single character would need matching color areas and matching color IDs. For existing characters, you can reference the Palette Editor (click on a sprite and you'll see the corresponding color ID as a circled number in the sidebar).
5.2.0 update: Apparently, official color IDs can change. So I guess it's not important to stay consistent with them in your submissions.
See my replies below for example submissions.

I wonder if this false color map is good enough
Yeah, you can easily make the necessary layers with these two references.Just wondering, what if the base.png is of the one color, will it work?


For the base color layer, make it a single solid color. No shading, no highlights, no detail, no gaps. Just one huge gray blob that's completely #cbcbcb. (Again, the no gap thing is optional if you really don't want to put that much effort into it.)it was mainly #CBCBCB already
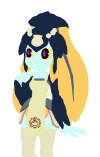
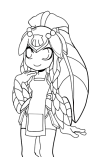
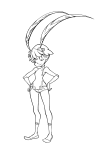
Curious where is this reference image from and was it originally grayscale?Just wondering, what if the base.png is of the one color, will it work? for example soView attachment 19619
maybe it fits?For the color area layer, it's better if the colors are touching. No gaps. (This is optional, but if left as is, clicking the eyebrow in the Palette Editor will select the background instead of the face.)
For the base color layer, make it a single solid color. No shading, no highlights, no detail, no gaps. Just one huge gray blob that's completely #cbcbcb. (Again, the no gap thing is optional if you really don't want to put that much effort into it.)
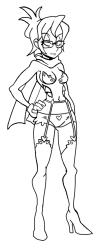
The line layer is perfect.
The raw layer is perfect. Background removal wasn't necessary but that doesn't matter.
I don't need the highlight and shadow layers. My script generates these from the raw and base layers.
Reminder that there are several sample submissions in the first few replies to this thread.


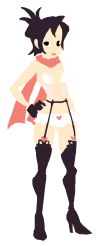
Thanks you : )Following the "no gaps" requirement, I'll add these to the line and raw layers from my previous post:
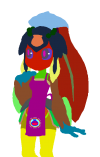
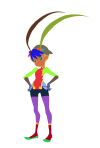
View attachment 19669View attachment 19670
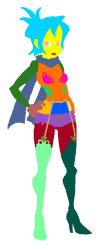
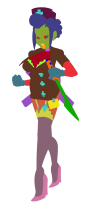
area and base layers

Thank you! While the process wasn't that confusing, i'm hoping it's correct! Already got some other characters readyThat's some serious sprite work! Kudos for figuring out the process.If I ever dive into palette editing, I'll definitely keep this in mind. Thanks for sharing the pipeline!

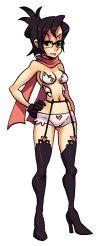
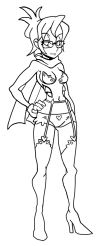
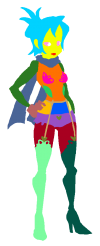
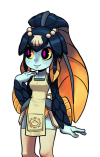
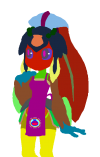
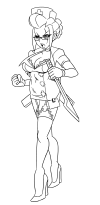
Beautiful. An actual submission instead of a request.Here's my attempt at making Venus for the palette editor. Any feedback would be appreciated.
line.png and outline her pupils.area.png, her arm on the right matches her torso. I fixed it so it matches her other arm instead.area.png could be cleaner, but all the mess is hidden under the line layer so it's fine.